¶ Layout Designer
The Layout Designer is a visual drag-and-drop tool that lets you create tent and event layouts for your customers. You can place tables, chairs, dance floors, bars, DJ booths, and other elements on a scaled tent canvas, then export the layout as a professional PDF with your business branding.
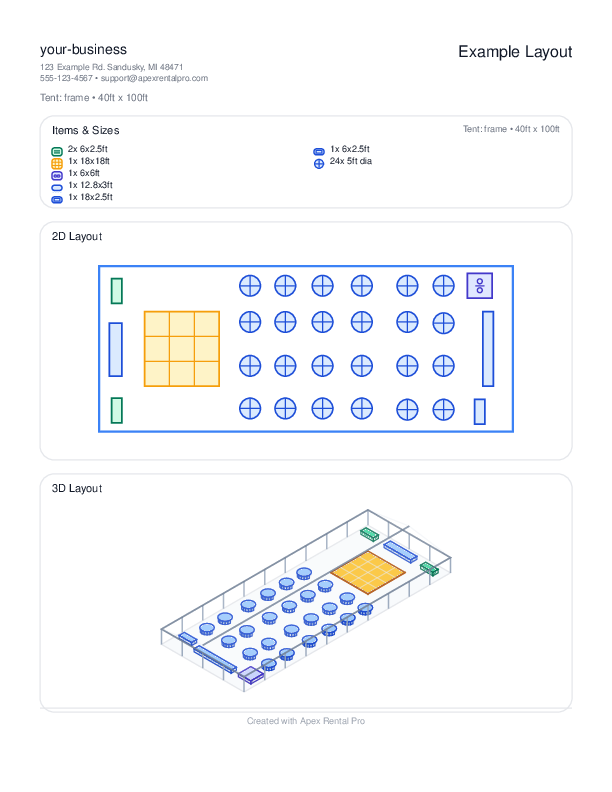
Here's an example:
¶ Accessing the Layout Designer
Navigate to Layouts from the sidebar menu, or click the Layout Designer icon. This opens the full-screen layout editor.
Note: The Layout Designer is included with Apex Rental Pro, trials included.
¶ Creating a Layout
- Click New Layout.
- Enter a Name for the layout (e.g., "Johnson Wedding - 40x80 Frame Tent").
- Optionally link it to an existing Event from your calendar.
- The canvas opens with a default tent outline. Configure the tent dimensions:
- Width (default from settings, typically 40ft)
- Length (default from settings, typically 60ft)
- Tent Type (frame or pole — affects center pole placement)
- Drag items from the Palette onto the canvas:
- Tables (standard, round, 8ft banquet, head table, wedding party table)
- Chairs
- Dance floors (12x12, 14x14, 16x16)
- Bars
- DJ booths
- Custom palette items you've created
- Arrange items by dragging, rotating, and resizing them.
- Click Save to store the layout.
¶ The Palette
The palette is your toolbox of items you can place on the canvas. It comes pre-loaded with common rental items and can be customized:
¶ Default Palette Items
- Standard Table (6ft rectangular)
- Round Table (5ft diameter)
- 8ft Banquet Table
- Standard Chair
- Dance Floors (12x12, 14x14, 16x16)
- Bar
- DJ Booth
- Head Table
- Wedding Party Table
¶ Custom Palette Items
Navigate to Layout Palette (accessible from the Layout Designer settings) to add custom items:
- Click Add Item.
- Enter a Code (unique identifier), Name, and Category.
- Choose a Shape (rectangle or circle).
- Set Default Width and Default Height in feet.
- Optionally upload a custom Image for the item.
- Click Save.
¶ Editing a Layout
Open any saved layout from the list. The canvas loads with all previously placed items. You can:
- Move items by dragging
- Rotate items by using rotation handles
- Resize items by dragging corners
- Delete items by selecting and pressing Delete or using the remove button
- Duplicate items for quick placement
- Change tent dimensions at any time
- Select multiple items (drag a box or shift-click) and align/distribute them as a group
- Undo / Redo any change with the history buttons or Ctrl+Z / Ctrl+Y
¶ Speed Mode vs. Precision Mode
Two editor modes live in the top toolbar. Switch between them depending on what you're doing:
- Speed Mode — snappy drag-and-drop with looser snapping, good for rough drafts and quickly mocking up a floor plan while a customer is on the phone.
- Precision Mode — fine-grain snap-to-grid, numeric inputs for position and rotation, and alignment guides as you drag. Use this when you're finalizing a layout for PDF export.
You can flip modes at any time without losing work.
¶ Checkpoints & History
Every time you save, the Layout Designer also snapshots a Checkpoint you can return to:
- Click the history icon to see a timestamped list of recent checkpoints.
- Click any checkpoint to preview it; click Restore to roll the canvas back to that state.
- Checkpoints are automatic — you don't have to name or manage them.
This is useful when a customer says "actually, can we go back to the one with the U-shaped head table" after you've reworked things three times.
¶ Quick Start Templates
When creating a new layout, you can start from a Quick Start template instead of a blank canvas:
- 40×60 wedding reception (round tables + dance floor + head table)
- 30×60 corporate event (rectangular seating + stage)
- Cocktail reception (high-tops + bars)
- Graduation / grad party
- Custom templates you've saved from your own past layouts
Pick a Quick Start, then customize from there.
(Quick Start appears for Rental and Party profiles. Lawn Care and other service profiles don't see a Quick Start list.)
¶ Exporting as PDF
Click Export PDF to generate a professional layout PDF. The PDF includes:
- Your business name and logo (pulled from Settings)
- The layout name and event details
- A scaled visual rendering of the tent and all placed items
- Item labels and dimensions
¶ Attaching Layouts to Quotes and Invoices
Layouts can be attached to quotes and invoices:
- Open a quote or invoice.
- In the Layouts section, click Attach Layout.
- Select from your saved layouts.
- The layout is now linked to that quote/invoice.
When you email a quote or invoice, attached layout PDFs are automatically included as additional attachments. Customers can also view their layouts via a secure public link.
¶ Emailing Layouts
You can email a layout directly from the Layout Designer. This sends the layout PDF to the customer linked to the event.
¶ Public Layout Links
When a layout is attached to a quote or event, a public link is generated that customers can access without logging in. These links use secure tokens and show:
- A list of all attached layouts
- Direct PDF download links for each layout
- Quote/event customer name and date
¶ Gotchas
- Tent type matters: Choosing "pole" tent type adds center pole markers to the canvas that you need to work around when placing items. "Frame" tents have no center poles, giving you more usable space. Make sure you select the correct tent type for accurate layouts.
- Default dimensions from settings: The default tent width and length come from your Settings. You can change them per layout, but setting sensible defaults in Settings saves time.
- Layout-event linking: Linking a layout to an event is optional. Unlinked layouts are standalone and can be attached to any quote or invoice. Linked layouts show up in the event's detail panel.
- Very complex layouts take longer: Layouts with many items can take a moment to render as a PDF.
- Palette customization is global: Custom palette items are available in all layouts, not per-layout. Adding a custom palette item makes it available everywhere.
- Images for palette items: Custom palette items can have images, but they must be in a supported format (PNG, JPG). Large images are resized. If no image is provided, the item renders as a simple shape with a label.
- Keep layouts under ~200 items: Very complex layouts with hundreds of items may slow down the editor. For best performance, keep layouts under about 200 placed items.